Prerequisites
To enable all functions in Darius it is recommended to use the most recent version of Internet browser available. The minimum version of Internet Explorer supported by Darius is IE11, while Chrome, Safari and Firefox are all supported.
Navigation
When you log into Darius you will be automatically directed to the Dashboard and from there you can navigate to other areas of the product.
Campaigns – shows all the campaigns that have been created on the account.
Publication Centre - shows a list of:
- Scheduled items to be published such as emails, SMS and Social Media posts.
- Publishing shows a list of emails, SMS or Social Media posts that are currently being processed/published out.
- Published shows a list of emails, SMS, Social Media posts and Landing pages with the time, date and user who published. Emails and SMS will provide a “Detail” button showing the list of email addresses or phone numbers the component was published to.
Read more in Publication Centre
Audience - displays, and allows segmentation of Engagers on your account.
Profiler – displays several pre-designed reports for more information available on engagers and campaigns.
See Profiler for more information.
Store Manager – allows the user to view and manage their stores integration points including Store Listings, Coupons/Vouchers, WiFi, iBeacons etc. N.B. not available when using Darius Engage only.
See Store Manager for more information.
Rules – this is an account level rule manager for creating
React Rules. N.B. not available when using Darius Engage only.
See Rules for more information.
Search tool (Spy glass icon) – this is used to search for an engager or items that are campaign or account.
View the Search a Campaign for more information.
User Name – The drop-down menu available under the user name has the following options:
- Change Account – if the user has been granted access to more than one account the account can be changed by clicking on the account name and choosing the new account from the drop-down pop up window that appears.
- Preferences – allows the user to choose to update their Password, add 2-step auth to access the account and update Social Network details.
- Message Centre – displays messages from publishes such as “SMS successfully published” etc.
- Account Management – Allows the user to view email and SMS credits and purchase more SMS Credits.
- Import - allows the user to Import Engagers and view the Import History for the account.
- Search/Edit - used to search individual engagers email addresses, and edit items like subscription preferences.
- Tags - shows a full list of tags on the account and from here the user can Edit or Delete Tags. See Account Management for more information
- Logout – automatically logs the user out.
Help - under this drop-down menu the user can view the User Manual, Access the
e-Learning Platform (note this link will take you away from Darius™ and into our e-Learning partner site
Grovo.
Search Tool
Searching for an engager or items that are campaign or account specific can be done quickly using the Search tool. To use the Search tool, the user clicks on the magnifying glass on the navigation bar. Below are examples of how the user can find specific items while using the search tool:
- Searching for a specific email address – This will give the user a chance to view what landing pages the email address has engaged in; how many times they have engaged with Darius and if that email address is a registered user of Darius it will also show what actions the user made in the audit log section. When searching for a specific email address, the user can view the profile associated with the email address to find out if they are subscribed to receive email or SMS.
- Searching for a phrase or word – Searching for a phrase like “weekly circular” it will allow user to see where it’s been used in all areas of Darius may it be in the Campaign Builder, Survey Centre or the Audit Log.
Account Management
Consumables (SMS Keywords & credits – keyword request)
In the consumables section of Darius, it allows the user to view how many SMS and Email credits that are available. Keeping a close eye on this section is important. If the account runs out of SMS or Email credits the account will not be able to send communications via Email or SMS.
If the account runs out of email or SMS credits, simply click the
Order SMS Credits button.
This will then direct the user to a form where the user can order both SMS credits or order a keyword. Keywords are only required for inbound SMS.
Engagements
Engager
- Search/Edit
Search/Edit is great for viewing and editing an engager’s profile. To use this function the user can simply type the email address in the search bar and click the Email Address button.
The user will be presented with a detailed profile, starting with their engagers ID, Personal information and a list of tags of what campaigns they have engaged in. If an engager has completed their details by mistake on a landing page, the user can simply remove a tag by clicking the x icon in the Engager Tags section.
In addition the user also has the option to edit the engager's profile, for example to updated the users cell number or subscribe or unsubscribe from SMS and Email.
- Tags
Tagging is one of the most important things to do when creating a campaign in Darius. Adding a tag to a campaign allows the user to target specific engagers in the future, e.g. if the user wants to target engagers who only like wine then they can publish to that specific tag. Sometimes too many tags can be added or similar tags added and this is when the tag section becomes cluttered. The Tags Section is broken up into 3 sections:
- Tag – Every tag associated with the account
- Engager Count – How many engagers are in each tag
- Actions – The user can edit the name of the tag or delete the tag.
Editing the name of a tag can be used if something has changed in the mid-way through a campaign, the tag can be edited to suit the campaign.
Deleting tags can be used if a tag will no longer be used in the future, or if the tagging section needs to be decluttered.
Note: ONCE THE USER DELETES A TAG, IT CANNOT BE UNDONE.
Go to Top
Dashboard
Darius makes it easy for every user to customize their own dashboard and get a better sense of how their campaigns are performing. To access your personal Dashboard click the Darius for Retail™ logo located at the top left hand side of the screen.
Users can customize their dashboard experience, by clicking the
+ icon at the top right of the page.
A variety of widget options will appear across the top -- such as Darius Assistant, My Reports, Campaign Metrics, All Stores, Store Revenue, Store Transactions, Shoppers in Store and IOT Data. Click on the widgets you want displayed in your dashboard, and they will appear automatically.
You can move the widgets around by dragging and dropping them into place. You can also change the size of each widget window.
Click on the gear icon next to each widget’s name to customize it. This lets you change the name of the widget, and it will also bring up a list of filters. You can adjust the filters for each widget to focus only on specific stores or time periods.
If you want to create a *new* campaign, click on
Darius Assistant and begin by typing in “
Create New Campaign”. Darius Assistant will then take the user through the steps to create a new campaign by going through the different components.
If you need to undo any changes, just hit the
Revert button in the upper right corner. When you’re done setting up your custom dashboard, click the
Save icon in the top right. Remember that you can access your dashboard and make adjustments to it at any time - just click on the Darius™ logo at the top left to return to the Dashboard, and the gear to make changes.
Darius™ Assistant
The Darius Assistant functions as a built user companion, designed to assist users in completing a number of tasks such as generating reports and tagging engagements. To familiarise yourself with the Darius Assistant and its capabilities, begin by typing the phrase
“Help” in the dialogue box. From here the Darius Assistant will present you with a number of functions, some of which are listed below.
- create a like tag
- create a dislike tag
- create an allergy tag
- the engager likes coffee
- the engager is allergic to gluten
- the engager dislikes cheese
The tagging functionality within the Darius Assistant allows you to generate a number of pseudo-tags, that can be applied to users in a number of ways, including through profiler (
see Quick Actions), through a Darius Engage engagement rule or through a Darius React engagement rule. Pseudo-tags are generated based on user input and follow format similar to the one shown below.
vww:like:product.brand=pepsi
These pseudo-tags can be generated and used to define a number of things including customer preference and allergy. SAMANTIC-tags allow Darius to tag automatically tag customers based on their transactions, allowing for more effective and targeted communication.
For example, if a customer were to consistently purchase “Gluten Free” products, Darius would tag them as such, using the pseudo-tag you have created.
Go to Top
Component Overview
Campaign Viewer
The Darius Campaign Viewer is the main Dashboard which provides an at a glance view of all the campaigns on your account. A small graph is displayed on each campaign showing the number of views for the current calendar month. This graph will take you to the Metrics page where you can take a more granular look at the campaign metrics.
Each campaign on the Campaign Viewer includes a Workbench button and an Engagers button. The Workbench is where campaigns are built by adding different components or channels e.g. landing page, social media and SMS. The Engagers section will display information from the Lead Capture on all those who have engaged in the campaign.
The Campaign Viewer will display up to 15 campaigns on each page. Clicking on the arrows at the bottom of the screen will allow the user to click through the pages of available campaigns. Use the
+ Create Campaign button, to add a brand new campaign which appears as the first campaign on the Campaign Viewer. Please note, that after saving changes to a campaign it will be displayed as the first campaign on the dashboard which allows the user to see the campaigns which are currently being worked on displayed first. The Campaign Viewer has been designed so those campaigns which you are currently working on are displayed first.
Campaigns
Campaigns are created for all communications being published on a particular topic. They
can comprise of any number of the following elements:
- Landing Page - a single web page which is standalone from a main website and has been designed for a single focused objective e.g. inform a set group of people about an upcoming event. This can include:
- Lead Capture - form for engagers to complete their personal details e.g. to register for an event.
- Survey - used to elicit more information from a recipient or allow them to express their views e.g. 'Did you enjoy the event?'
- Social Media - the ability to post content to social networks:
- Facebook - an online social networking channel directly connected to Darius enabling the user to post content to one or more connected Facebook pages. Click here for more details.
- Twitter - an online social networking and microblogging service connected through Darius that enables registered users to post a max of 140 characters known as tweet. Click here for more details.
- Outbound SMS (Short Message
Service) - this is a text message service sent directly from Darius to a selected audience groups mobile phone. Outbound SMS can contain text, web links or short URL's to Darius landing pages or other web pages can be pasted into each text message.
- Email - emails can be designed and published in Darius. The email can contain a link to a landing page which provides more information / asks a user to register and can be built with text and / or graphics.
-
Engagement Rules - the ability to perform an action (e.g. auto respond with an SMS) after an engagement. They have two parts which are the condition and the action - the action will only be performed when the condition is met:
- Condition - Can be either engagement via landing page or inbound SMS which starts with a specific string.
- Action - Offers the ability to respond to engager with an SMS or email, tag the engager or email the engagement rule creator informing them there has been an engagement.
In addition to the above a user can add Tracking to a campaign. This enables the user to measure how a landing page was accessed e.g. via Facebook or Twitter, from an email or SMS, etc.
Multiple Tracking URLs can be created directing the recipient to a specific landing page within a campaign. When a Tracking URL is created, a QR Code is automatically generated and is also directly linked to a landing page. QR Codes can be downloaded directly from this section and used in offline media such as posters and billboards to increase interaction on a particular campaign.
Go to Top
Publishing
With Darius, content can be published directly through various channels (see below for a full list of channels). In addition to this, the publishing of content, can be scheduled to be posted at a specific date and time. If scheduled content is to be published at a specific time, the time selected is the time zone assigned to the account when created.
After the content has been successfully published a Message will be posted to the Message Centre stating it has been successfully published. For example, if sending 1,000 emails, this message will appear after the 1,000th email has been sent. N.B. time should be allowed for the content to be published.
Read more about Published articles in Publication Centre.
- Landing Page - Once designed the landing page(s) can be published. Only when it has been published can Tracked URLs be created.
-
Social
- Facebook - Can either be a simple post to a Facebook page containing text only or a post containing both text and the Create Tracking URL button, which, once published will take the user to a previously published landing page.
- Twitter - Can either be a simple tweet (of up to 140 characters) or, as with Facebook, could contain a link to a previously published Darius landing page by using Create Tracking URL.
- SMS Outbound - Can be used to send a standard SMS and can contain a link to a landing page. IMPORTANT: SMS will only be sent to those engagers who have given permission to be contacted via text message.
- Email - Like SMS, emails will only be sent to engagers who have given their consent to being contacted via email. All published emails will contain an unsubscribe link.
- QR Codes - Created in Tracked URLs are two-dimensional barcodes which when scanned by a smartphone app will take a user to a previously created landing page.
Metrics
For any campaign component published, Darius displays the number of views and engagements for the landing page(s), and how it was accessed i.e. was it accessed from the Facebook, Twitter post, or through another Tracked URL.
A view is termed as a user clicking onto a landing page, whether or not they submit Lead Capture.
An engagement is termed as a user accessing a landing page and completing the Lead Capture form.
Access the metrics section for the campaign through the Dashboard, by clicking on the overview - N.B. the graph will only display if there have been views on the campaign. Once in the Metrics section the below data for the current month will be displayed for that campaign. The data will be presented on different tabs depending on the component i.e. Overview, Landing pages, Tracked URLs and Emails.
- The total number of landing page views and engagements (combined total for all landing pages in the campaign).
- The total number of views and engagements for each landing page.
- The number of landing page views and engagements from each tracked URL.
- The number of opens for each email in your campaign.
Engagers
When an engagement is made Darius will use this data to build a profile on the engager - the profile can be built upon further with data from additional campaigns. The
Engagers section is accessed from the Workbench displaying First Name, Last Name, Email Address and Cell / Mobile Number of all those who engaged in your campaign. The engagers are displayed in order of engagement, showing the latest engagement at the top.
Go to Top
Create a Campaign
To create a campaign in Darius, the user should navigate to the Dashboard and select
+ Create Campaign. This will add a campaign to the Dashboard giving it a default name of Campaign followed by the current date and time in the format
Campaign yyyy-mm-dd hh:mm:ss. A Campaign Name can be changed from the Dashboard by entering the new name, and selecting the tick button to the right of the campaign name. The campaign name can be changed at any stage if required. If no data has been collected for the campaign a graphic will be displayed in place of the overview graph, which will change with the first view of the landing page.
To start building the campaign, click on the Workbench button. This will display the page from where the build of the campaign (e.g. landing page and SMS, etc) will take place. To add a component to the Workbench select
+ Add Component and from the drop down menu, choose the component to be added. Choose from the following:
It should be noted that more than one of each component can be added if required. Each of the above components are listed below with an example of a Cake Fair.
A simple campaign inviting people register their attendance at an event may consist of the following:
- Landing page with details of the event which includes a Lead Capture asking people to register to attend.
- An email which will be sent to your selected audience. This will include a link to the landing page.
- Auto-responder with an email thinking them for registering, maybe containing details of car parking at the event.
- A tracked URL which will be included in the email to measure the number of people who view and engage.
-
An engagement rule which will do the following:
Tag users as Event2014 so you know this group are going to attend. Enables follow up communications after the event asking people to express their opinions on the event.
Campaign Landing Page
With the landing page now visible on the Workbench, select
Design to begin the creation of the landing page - N.B. Tracked URLs can only be selected after the landing page has been published. Click
Select Template to choose one of the drag and drop templates or one of the set templates to begin creation of the landing page. Give the landing page a
Title - this will be displayed on the Workbench and breadcrumb navigation. After giving the campaign a title the landing page design can commence using the text editor.
If using a Drag & Drop Template You can select the layout of your page by using the snippet section on the right hand side. Simply drag the snippet onto your page between the dotted lines. On the right hand side you can change the name of your, the colour of your page and you can edit each section by selecting the segment for editing and typing in your own text. To make changes to the page using the text editor follow the steps below. If using a template with existing text, amend the text and change the images if required.
To change an image in the template:
- Double click on the image to be changed which will display the Image Properties dialogue box.
- Using the Link tab provide the URL to where your image is stored OR click the Upload tab, choose the image from the computers file finder and click "send it to the server" and OK to complete.
- Resize the image if required.
- Select OK.
The text editor provides great flexibility and ability to add the below to your landing page:
- Text
- Images
- Tables
- YouTube videos
- iFrames
- Links to external websites
- Bulleted and numbered lists
- Lead Capture and Survey (to be discussed in a later section)
For more information on the text editor click here.
At any stage during the creation of the landing page, it can be previewed to give an indication of how the published page will display. When clicking on the
Preview button, the landing page is saved and displayed. To return to the design view from the preview screen select the landing page from the breadcrumb navigation. When the design is finished on the landing page click
Publish. The next screen displays a link which clicks through to the published landing page.
When a landing page has been published, the publish time on the Workbench will also be updated to the date and time of the publish.
Go to Top
Lead Capture & Survey
The Lead Capture & Survey elements are added during the design of the landing page and follow these rules:
- A campaign can have Lead Capture without having a Survey.
- Survey questions in your campaign must have Lead Capture.
To add these components, select the
Insert a Lead Capture Form button from the editor. This will then display a separate dialogue box where the fields can be added. Email is marked as a required field as it is mandatory for all engagements. The order the Lead Capture fields will be displayed in, will be the same as the order they were added. To add additional fields to the Lead Capture, click
+ Add Field to select the fields from the following:
- First Name - adds a free text field.
- Last Name - adds a free text field.
- Mobile / Cell Number - adds a country code drop-down box followed by a mobile / cell number free text field.
- Address - adds two free text fields for Address Line 1 and Address Line 2.
- City - adds a free text field.
- State - adds a drop-down selection of all US States.
- Postal / ZIP Code - adds a free text field.
- Gender - adds a drop-down with male / female options.
- Date of Birth - adds a calendar which allows a user to select their Date of Birth.
To mark a field as required or mandatory, select the relevant "required" checkbox for that field. An asterisk will be displayed alongside any field which is required. If an engager attempts to submit their Lead Capture without completing a required field, an error message will be displayed.
Click
Next to move onto the entry of terms & conditions. If there are no terms & conditions to be added, select the
No terms and conditions radio button. To add a terms & conditions checkbox, select the relevant option and provide a link to a website or online location where they are hosted OR paste them into the text area. If the terms & conditions are hosted on an external website, the full URL will need to be provided otherwise an error will be displayed saying '
Please enter a valid URL' i.e. it should be http://www.example.co.uk/terms rather than www.example.co.uk/terms. Click
Next for a preview of the Lead Capture. N.B. After a landing page has been published an engager can click on Terms & Conditions to view. This will open a new tab in their browser.
After clicking
Save on the preview screen Survey questions can be added by answering
Yes to the question You have a choice of creating a survey with your Lead Capture, do you wish to create one. If a survey is not required, select
No and continue designing the landing page.
If Yes is selected then the user should move through the following steps to build the
survey:
- Click on + Create Question to add a question.
- Click Edit to compose the questions and response(s) if applicable - The order of the questions when published will be the same as the order in which they were added.
Give the question a meaningful name so when examining the Audience later, it is apparent what answers relate to which question.
-
Select the question response type from the options shown below and the dialogue box dynamically changes based on what is selected:
- Free Text - displays the question box and a one-line free text box.
- Multiline Free Text - displays the question box and a multiline free text box.
- Dropdown Select - displays the question box and one dropdown option with plus and minus buttons to add further options.
- Multiple Choice - displays the question box and one multiple choice option with plus and minus buttons to add further options.
- Indicate if an answer is required to the question by selecting the Required checkbox - note that if it is a Multiple Choice, the engager will need to select at least one answer.
- Enter the question as it will appear on screen.
- For both free text and multiline free text responses, enter placeholder text an engager will see before answering the survey question.
For dropdown and multiple, enter at least one option. Additional options can be added by selecting the + button.
- Select Next to return to the main survey builder screen where the above steps can be repeated to add more questions to your survey.
- When finished the survey select
Complete which will insert the survey into the Landing Page.
Survey questions will be displayed on the Landing Page, after the last Lead Capture element, but before the Engage button. You can insert some text between the Lead Capture and Survey if required.
Once finished adding Survey and Lead Capture, a Lead Capture Response page is required to be designed before publishing or previewing the landing page. A Lead Capture Response page is displayed to a user after they have engaged on the campaign or landing page. Select
Design Responder where the page can be designed using the same editor as the landing page. Once complete, select
Save or
Back which will save the Lead Capture Response and return to the landing page design view. Finalise the landing page design and
Publish using the steps outlined in the landing page section.
Lead Capture Amends
A number of amends may be made to sections of the lead capture based on regional requirements such as county and state. Such amends can be made simply through use of the source button, found in the upper left hand corner of the Darius editor. The default selection for County and State is the American states, however this can be amended by following the instructions below.
- United Kingdom Counties
- Irish Counties
Go to Top
Email
Email Design
Once an Email component has been added to the campaign in the Workbench select
Design from within component. Select one of the available templates to base the email on. After the template is selected, the email design can commence.
If you selected the drag and drop template you can select the layout of your email by using the snippet section on the right hand side. Simply drag the snippet onto your page between the dotted lines. On the right hand side you can change the background colour of your page.
In the email design page, the following detail is required:
- Email Title - This will be used on the Workbench to differentiate one email component from another and should clearly summarise the email in a couple of words.
- Subject - the subject line which appears in the recipients inbox.
- Sender Name - the name of the account the email will come from.
- Sender Email Address - this is the reply-to email address and must be validated. Your organisations email address domain maybe verified during account setup. If publishing from an account or domain not verified, this email address will require verifying before the email can be previewed or published. A notification will appear on screen to alert the user if the email address provided is verified or not.
Email Address Verification
During account setup the requested email address domain maybe verified (i.e. the example.com part of the me@example.com email address). If however you would like to use an email address outside of this, prior to using it for the first time, you will need to verify it using the following steps. N.B. After entering the Email Title, Subject, Sender Name and Sender Email address select
Save. At this point a message will be displayed saying either:
- Sender email address has not been verified. Please click the Verify Sender Address button to verify the address is valid.
- Sender email address has been verified.
Verification will only take place once. If the email address requires verification, select
Verify Sender Address. The email address input will receive an email from
Amazon Web Services with a subject line of
Amazon SES Address Verification Request in region EU (Ireland) where EU and Ireland have been used as examples of the subject line and will depend on the region and country of the users location. This email will contain a verification link which should be clicked on to verify the email address - N.B. this link will expire in 24 hours. After clicking the link, the email address is then verified. A browser refresh is recommended. Upon refresh the text
Sender email address has been verified will be displayed. Email design can now continue.
Email uses the same editor as the Landing Page to add images, text and external links as before.
Email Publish
When email design is complete, select
Preview, which will show what the published
email will look like. This action will also save the email. Once happy with the look of
your email, select
Publish which will save the email. The displayed screen
enables the user to select to whom the email should be sent to. The options include:
- Publish to specific tags -
users can be tagged when they engage on a campaign. Tags are setup in the
Engagement Rule of the Campaign.
- Send to specific engagers - to
publish content to specific engagers based on the rules defined.
Publishing to specific tags / engagers is completed at an account level i.e. if Joe Bloggs has engaged in a different campaign on the account, the user will be able to publish to them. If publishing the email to tags use the Publish Page. Clicking on the text area, will display which tags are available to post to. After selecting the tag(s) to publish to, click
Apply. The Engagers table will then display the engagers who will receive the email. If publishing to specific engagers, the following criteria will appear:
- Containing - the field needs to contain the information given.
- Does not contain - the field should not contain this information.
- Is - the field needs to be identical to the informations given.
- Is not - the field is something different other the information given.
When selecting the "conditions", decide which field it should be based on from any of the below (up to 3 "conditions" can be added):
- First Name
- Last Name
- Email
- Phone Number
- Dialling Code
- Gender
- Street Address 1
- Street Address 2
- City
- State
- Postcode
Finally enter the search criteria for each condition selected. If for example the content is to be published based on Gender, type in either
Male or
Female depending on to whom the content is to be published to. These rules are built as an OR so for each rule selected recipients will receive the content if they satisfy any one of the rules. For example if the rule of First Name containing Joe and a rule of Last Name is Bloggs, then any users with either a First Name containing the text Joe or a Last Name of Bloggs will receive the published email. The table displayed at the bottom on the same page will show all those engagers who are due to receive the email at that time. N.B. If someone who matches the search criteria engages between when the rules are set for email recipients and publication, they will also receive the email - in other words these rules are dynamic up until time of publication. If an engager has not given their consent to be contacted via email, it will not be issues to this user.
To publish the email to all those who have engaged on the account:
- Select Containing
- Select Email
- Input * as the search criteria
As before a
* is used as a wildcard character and so this will match on all opted in email addresses who have engaged on the account resulting in the email being published to all engagers on the account.
Once decided to whom the email is to be published to, click
Next.
This takes the user to the Publish Schedule screen, offering the selection of when the email is to be published, choosing from Publish Now or Schedule.
- To Publish Now, simply select the Publish Now radio button followed by the Publish button.
- To schedule the publishing of your email, select the Schedule radio button. Select the date and time for the email to be published, followed by the Publish button. N.B. the email will be published based on the time zone assigned to the account. Click the Publish button.
Go to Top
Outbound SMS
SMS Design
Once an SMS component has been added to the campaign in the Workbench, select
Design on the component. Give the SMS component a title, sender name and content:
- SMS Title - Should be an identifier name for the SMS and will be used in the breadcrumb navigations. This should be relevant to the SMS and relevant to other users who will view the campaign. A campaign can have more than one SMS, so it is important to be clear.
- Sender Name - This is who the SMS will appear to be received from. This is limited to 11 characters with no spaces. N.B. This is only relative in the UK and Ireland. All messages published to a number in the US & Canada will appear from 24012.
- SMS Content - This can include text and a URL if desired. To add a URL to the SMS, create and copy the link from the connected Tracking URL section. There is no character limit as the SMS will be converted into more than one SMS if the receivers device permits, however be aware that if the SMS is over 120 characters the account will be charged accordingly for two text messages; over 240 characters will be charged at 3 text messages and so on. N.B. Each message sent automatically has an opt out message tagged to the end of the message. This opt out, industry best practice, is 36 characters and although this doesn't appear when composing the SMS, it will be accounted for within the character limit when publishing.
SMS Publish
When the SMS has been written, select
Save, which will store the SMS. Once happy with the content, select
Publish which will save any changes made to the SMS since the last save. The displayed screen enables the user to select to whom the SMS should be sent to. The options include:
- Publish to specific tags - users can be tagged when they engage on a campaign. Tags are setup in the
Engagement Rule of your Campaign.
- Send to specific engagers - you can publish content to specific engagers based on rules defined.
Publishing to specific tags / engagers is completed at an account level i.e. if Joe Bloggs has engaged in a different campaign on the account, the user will be able to publish to them. If publishing the SMS to tags, use the Publish Page. Clicking on the text area, will display which tags are available to post to. After selecting the tag(s) to publish to, click
Apply. The Engagers table will then display the engagers who will receive the SMS. If publishing to specific engagers, the following criteria will appear:
- Containing - the field needs to contain the information given.
- Does not contain - the field should not contain the information given.
- Is - the field needs to be identical to the information given.
- Is not - the field is something different other than the information given.
When selecting the "conditions", decide which field it should be based on from any of
the below (up to 3 "conditions" can be added):
- First Name
- Last Name
- Email
- Phone Number
- Dialling Code
- Gender
- Street Address 1
- Street Address 2
- City
- State
- Postcode
Finally enter the search criteria for each condition selected. If for example the content is to be published based on Gender, type in either
Male or
Female depending on to whom the content is to be published to. These rules are built as an OR so for each rule you select recipients will receive the content if they satisfy any one of the rules. For example if the rule of First Name containing Joe and a rule of Last Name is Bloggs, then any users with either a First Name containing the text Joe or a Last Name of Bloggs will receive the published SMS. The table displayed at the bottom on the same page will show all those engagers who are due to receive the SMS at that time. N.B. If someone who matches the search criteria engages between when the rules are set for SMS recipients and publication, they will also receive the SMS - in other words these rules are dynamic up until time of publication. If an engager has not given their consent to be contacted via SMS, it will not be issued to this user.
To publish the SMS to all those who have engaged on the account:
- Select Containing
- Select Mobile / Cell Number
- Input * as the search criteria
As before a
* is used as a "wildcard" character and so this will match on all opted in mobile / cell numbers who have engaged on the account resulting in the SMS being published to all engagers on the account.
Once decided to whom the SMS is to be published to, click
Next.
This takes the user to the Publish Schedule screen, offering the selection of when the SMS is to be published, choosing from Publish Now or Schedule.
- To Publish Now, simply select the Publish Now radio button followed by the Publish button.
- To schedule the publishing of
the SMS, select the Schedule radio button. Select the Date and Time for the SMS
to be published, followed by the Publish button. N.B. The SMS will be published
based on the time zone assigned to the account. Click the Publish button.
Go to Top
Social Media
Social Media Design
The Social Media component on Darius, provides the ability to:
- Post identical content to a range of Facebook pages either scheduled or published immediately.
- Post identical content to a range of Twitter accounts either scheduled or published immediately.
- Post identical content to Facebook pages and Twitter accounts at the same time either scheduled or published immediately.
- Post different content to Facebook pages and Twitter accounts at the same time either scheduled or published immediately.
To begin the creation of a Social post, select Design from the Workbench after adding the Social component. Firstly, the post should be given a Title - similar to other components this should be meaningful to others and will be used in the breadcrumbs on Darius. After giving the post a Title, a user can then either select the Accounts it should be posted to or add a new account - for more information on adding a new account see
Appendix I – Setting up Social Media Accounts or
Appendix II – Revoking Access to Social Media Accounts.
Darius automatically populates a list of Facebook pages and Twitter accounts a user has permissions to post to, with the permission level being determined by the account the user is currently using. To select which pages / accounts the content should be posted to, tick the relevant checkboxes on the Social channel(s). If posting to both Facebook and Twitter, the accounts are saved as a user toggles between the Facebook and Twitter tabs.
After selecting the account(s) which should be posted to, a user can then begin to create their content. The content text area applies to whatever social channel selected at that time. For example if the user is on the Facebook tab, this is the content which will be posted to the selected Facebook pages. On the other hand if the user is on the Twitter tab and writing content, there is a character countdown starting at 140 - if a tracked URL is included in the post, this will be included in the character count. On Twitter, hashtags and handles can be included in the tweet content.
A tracked URL (short link to a landing page) can be included in posts to both Facebook and Twitter if a landing page has been added to the engagement and has been published. To add a tracked URL to a post:
- Select Create Tracking URL
- Give the tracked link a name e.g. Test Landing Page from Facebook.
- Select the published landing page - more than one will be available to select if 1+ landing pages have been published.
- Select Create
After adding a Tracked URL this will be displayed in different places depending on the Social Media component as below. It will also be added to the Tracking URL section which is accessed from the Workbench.
- Facebook - the URL will be displayed below the content area. When the post is published, Facebook automatically scans the URL, extracting an image from the page in addition to a description of the page. To remove the tracked URL, select the X button.
- Twitter - the URL will be embedded into the content area and will be included in the character count. A user will then be able to click on the link when the tweet is published.
Social Media Publish
After selecting
Save and
Publish, the Publish Schedule screen which allows a user to select when the Social component is published. The content to Facebook and Twitter will be published at the same time. To publish content at different times, a user will need to have more than one Social Media component in the engagement. The post can either be published now, or scheduled.
- To Publish Now, select the
Publish Now radio button followed by the Publish button.
- On the other hand, if to schedule the publishing of Facebook and Twitter posts, select the Schedule
radio button. The posts will then be published at the date and time selected by the user. The time is based on the time zone assigned to the users account when it is created. Click the Publish button.
Facebook / Twitter posts will now be published depending on when the user chose them to be published. When published a message will sent to the message centre confirming whether or not the publish has been successful.
Mobile notification
The Mobile notification component on Darius, provides the ability to push out notifications to engagers mobile in the form of a SMS message or a coupon.
- Mobile notification title - Should be an identifier name for the notification and will be used in the breadcrumb navigations. This should be relevant to the mobile notification and relevant to other users who will view the campaign. A campaign can have more than one mobile notification, so it is important to be clear.
-
Mobile notification type - This is split into two different ways in which the user can send a notification to the engager. This is done through a message or a coupon.
- Mobile notification message - This can include text and a URL if desired. To add a URL to the SMS, create and copy the link from the connected Tracking URL section. There is no character limit as the SMS will be converted into more than one SMS if the receivers device permits, however be aware that if the SMS is over 120 characters the account will be charged accordingly for two text messages; over 240 characters will be charged at 3 text messages and so on. N.B. Each message sent automatically has an opt out message tagged to the end of the message. This opt out, industry best practice, is 36 characters and although this doesn't appear when composing the SMS, it will be accounted for within the character limit when publishing.
- Coupon - The user can push out a coupon to engagers through mobile notification. The user can send this simply by selecting the name from the dropdown list then clicking send. The coupon cannot be built or edit in this section but can within store manages offer management section.
Go to Top
Engagement Rules
Engagement rules are used to control the action(s) Darius takes based on a user defined condition. For example if someone engages by sending an SMS which starts with WIN, an auto responder can be setup to thank the engager for their entry, while they could also be assigned a tag of CompetitionEntry. By doing this the entrant knows their competition entry was successful, while we know for future reference they responded on that competition, enabling the publishing of content to all those who responded to that engagement. Engagement rules can be added to an Engagement from the Workbench at any stage.
To begin the creation of an Engagement Rule, the user should select
Design from the Workbench. Then like all other components, the Engagement Rule should be given a title which will be seen on the Workbench and should be reflective of the Engagement Rule.
Engagement Rule - Condition
The Condition is the criteria which needs to be met for the Action to be applied - for example if nobody engages by sending WIN (the condition), then an SMS will not be sent to confirm competition entry (the action). Darius supports the following conditions:
-
Engagement via Landing Page using the following criteria
- Contains, does not contain, is and is not
- Various Lead Capture fields
-
Engagement via SMS in the form
of the message
The conditions in Darius are on an
OR basis - for example if there are two conditions at least one of them needs to be satisfied for the Action to be triggered. To complete the Condition, the text criteria should be entered by the user i.e. SMS starting with the text
WIN. Some examples of conditions are below. If an SMS condition is desired (e.g. SMS starts with WIN), contact support specifying the preferred keyword, the Engagement this should be applied to and the account. Tip: it is best to keep the keyword short and relevant to the engagement. Allow three working days for a keyword to be assigned to an engagement.
- Engagement via landing page containing email address * - as email address is a mandatory field in an Lead Capture, this ensures all respondents for the engagement will have the action performed.
- Engagement via landing page, first name is Joe - all those who engaged with a first name of Joe will have the action applied to them. This action will not be applied to those who engaged with a first name of anything other than Joe.
- Engagement via landing page, first name contains And - people who engaged with a first name containing the string Paul will have the action applied to them. This will include those who entered a first name of Andy and Andrew.
- Engagement via SMS and message starts with WIN - all those who send an SMS which starts with WIN will have the action applied to them.
If a condition is created which is based on State e.g. Alabama, New York, Texas, rather than putting the full state name as the criteria, the short code, from the table below should be used:
| State |
Short Code |
State |
Short Code |
State |
Short Code |
| Alabama |
AL |
Alaska |
AK |
Arizona |
AZ |
| Arkansas |
AR |
California |
CA |
Colorado |
CO |
| Connecticut |
CT |
Delaware |
DE |
Florida |
FL |
| Georgia |
GA |
Hawaii |
HI |
Idaho |
ID |
| Illinois |
IL |
Indiana |
IN |
Iowa |
IA |
| Kansas |
KS |
Kentucky |
KY |
Louisiana |
LA |
| Maine |
ME |
Maryland |
MD |
Massachusetts |
MA |
| Michigan |
MI |
Minnesota |
MN |
Mississippi |
MS |
| Missouri |
MO |
Montana |
MT |
Nebraska |
NE |
| Nevada |
NV |
New Hampshire |
NH |
New Jersey |
NJ |
| New Mexico |
NM |
New York |
NY |
North Carolina |
NC |
| North Dakota |
ND |
Ohio |
OH |
Oklahoma |
OK |
| Oregon |
OR |
Pennsylvania |
PA |
Rhode Island |
RI |
| South Carolina |
SC |
South Dakota |
SD |
Tennessee |
TN |
| Texas |
TX |
Utah |
UT |
Vermont |
VT |
| Virginia |
VA |
Washington |
WA |
West Virginia |
WV |
| Wisconsin |
WI |
Wyoming |
WY |
Engagement Rule - Action
When a Condition has been met, the Action will be performed, with Darius enabling the following Actions:
- Send Email to engager
- Send SMS to engager
- Tag Engager as - a tag should not contain any spaces.
- Send me an email - where me is the person who created the engagement rule.
Unlike conditions, actions are based on an AND basis i.e. if two actions are selected, both will be triggered when the condition is met. The only action where more than one is permitted is the ability to tag a respondent, however more than one rule can be setup per engagement. If there is more than one rule per engagement, caution should be exercised to ensure they do not overlap as this would mean respondents receiving more than one SMS.
For email & SMS actions, when they have been added, the user should select
Design to begin the creation of the SMS / Email which should be sent when the condition is met. When you are satisfied with the SMS / Email, selecting either
Save or
Back will return the user to the Engagement Rule - both options will save the SMS / Email. The Engagement Rule can then either be
Saved or
Saved & Enabled. By clicking Save & Enable the user will be returned to the Workbench, and it will display that the Engagement Rule is now Active.
Go to Top
Tracking URLs
Tracking URLs give the ability to measure how a landing page was accessed and how effective an organisation is at communicating with its audience on each channel i.e. how many people accessed the landing page by clicking on the link in the Facebook post, how many people accessed it by scanning the QR Code or how many people accessed it by clicking the link in the email. Tracking URLs can be created for a published landing page only after the landing page has been published. Tracking URLs can be created from the workbench or from a social post where they will be automatically embedded in the post. When a tracked URL is created for a published landing page, it will be shown in the Tracking URL section. A short URL, the long URL and a QR Code will be displayed for each Tracked URL.
-
Add a Tracking URL to a campaign for a specific landing page:
- From the Workbench, click on the Tracking Urls button.
- Select + Create Tracked Url to add a new Tracked URL.
- Give the Tracker a name
- this should be relevant to where it will be used e.g. if being included in an SMS, it may be called SMS Landing Page Name.
- Select Create
-
Add a Tracking URL to a Social Media post:
- From the Social Media component select Create Tracked Url.
- Give the tracked URL a name - this should be relevant to where it will be used e.g. if being included
in a Facebook post, it may be called Facebook Landing Page Name.
- Select the Landing Page the tracked URL is for from the drop down menu.
- Select Create.
- For Facebook the Tracked URL will appear below the post, and will be embedded in the post when
it is published, while for Twitter, the short URL is included in the content of the tweet.
- Any trackers created here will be added to the Tracked URL section for the landing page.
After a Tracked URL has been created, its name can be changed by selecting the
Edit button for the Tracked URL which needs changed in the Tracking URL section. To use a QR Code in offline media such as posters, a user should right click on the QR Code and select
Save Image As. It should then be saved with a relevant filename and can then be opened and resized in image editing software.
React Rules
A rule is how the users determine what and how the information if sent out after reacting to the engagers Proximity.
React Rule Wizard
The rule builder allows the users to customise the way in which the engagers receives information. This function is determined through the five stages in the rule builder:
- Action
- Parameters
- Trigger
- Frequency
- Save
Action
The first stage of the rule builder is to pick an action. This allows the users to select which form of information they would like to send out to their customers. For example, the users could pick either an Email, SMS or Offer to send to their customer. Its import to note that these actions need to be built in the campaigns sections before creating a rule.
Parameters
Parameters allows the user to select a campaign which helps define the users action. For example, if the action selected by the user was email then the parameter would involve selecting the appropriate email campaigns within the users account.
Trigger
Trigger is how Darius determines when to fire the rule which the user has created. This done when rules proximity reaction is triggered. There is a number of different options the user can pick to trigger their rule.
These include:
- When a shopper is near a beacon
- When a shopper connects to or disconnecting from WiFi
- When a shopper makes a purchase
- When an Internet of Things device event happens
- When an engagement happens
- When a car enters a car park
- When a car exits a car park
After selecting one of the above options the user can then customise their trigger rule. This helps the user to get the best result suited to their customers proximity. In the example below you can see that the user has selected to use a beacon. The user can now select what beacon and the range this beacon will reach.
Frequency
Frequency is how often the user wants their rule to fire. This allows the user to customise when and how frequent their customers receive this notification. There is a number of options for the user to trigger their rules at the right times and dates;
- As soon as each trigger event happens
- After a specified time period for each trigger event
- A given number of times per time period for each trigger event
- As soon as each trigger event happens, but only on at certain times
Save
The last stage of the rule builder is to simply name your rule and save it. After the rule has been saved it will be live according to the options the user has selected. The user also has the option to hide the rule from the store manager by clicking the box.
Go to Top
Measure
Profiler
Profiler provides users with a detailed analysis of their customers and their behaviour. It allows them to see, among other things, the way by which their database is segmented both in regard to demographics and user generated tags and customer purchase behaviour.
Profiler also allows users to directly communicate with their customers in a number of ways based on user generated segmentation. For example, Profiler may be used to publish an SMS to all females aged between 18 – 35 who have not purchased anything from your store within the last week, without the need to create a separate tag.
Profiler is broken up into seven types of Reports, each with unique analytical function. These sections are:
The user interface for several of the sections within profiler are similar in appearance and use, however differ significantly in their functionality. Transactions Report, Campaign Growth Report, Shoppers who have not purchased within the previous week/month all use a similar interface that allows users to select a date range and apply relevant levels of segmentation.
In the Engagement Profiler data can be segmented based on Age Range, Gender, Tag, Product Brand, Product Category, Product Subcategory, Store Name, Store Type and Store Administrative Division. Users can add each of these filters by selecting them from the
+ Add a new profile filter dropdown. Users can view the full list of segmented engagers by selecting the
Engagers button located left of the filter button.
Tracker Analysis, Basket Analysis and Shoppers reachable via email each use a unique user interfaces that will be discussed in more detail in the relevant sections below.
Quick Actions
Quick actions are a tool that exist within several sections of profiler. They allow users to tag and publish Mobile Notifications (if an app is available) and Emails to engagements based on the segmentation the user has previously defined.
Users can create Mobile Notifications Messages from the Quick Actions section, however offers published via Mobile Notification and Emails must be create separately using Darius Engage.
Transaction Report
Transaction Report provides users with an insight into the number of and nature of transactions within a selected time period. After selecting a time period, users can segment and filter transactions based on the parameters mentioned above.
From here, based on the above segmentation, users may communicate with the select group from the quick actions tab, found at the bottom of the page.
Campaign Growth Report
Campaign Growth Report provides users with an insight into how their database has grown over time. After selecting a time period, users can segment and filter engagements based on the parameters mentioned above.
From here, based on the above segmentation, users may communicate with the select group from the quick actions tab, found at the bottom of the page.
Tracker Analysis
Tracker Analysis is a unique tool that allows users to see how their customers interact with and share their content, and the number of subsequent engagements these shares result in. Tracker Analysis allows users to identify and communicate with brand advocates.
To use the Tracker Analysis, users must first select the tracker they wish to look at. From there, users are presented with an interface similar to the one shown below. Users are shown a list of the top 10 individuals who shared their content, the channels by which they shared it and the subsequent engagements that occurred as a result. This data is then presented on a spider diagram, to help users better visualise the way by which their content has been shared.
From here, users may also perform quick actions.
See Quick Actions for more information.
Basket Analysis
Basket Analysis provides users with insight into average customer spend and basket size. Data in this section is divided into predetermined time ranges. These ranges are All Time, Previous Week, Previous Month and Previous Quarter.
Shoppers who have not purchased with the previous week/month
The Shoppers who have not purchased with the previous week/month sections function similarly to the Transaction Report and Campaign Growth Report sections, however the date selection has been omitted. Instead, users are able to segment and communicate with customers who have not made a purchase within predetermined time ranges (One week and One Month).
From here, based on their chosen segmentation, users may communicate with the select group from the quick actions tab, found at the bottom of the page.
Shoppers reachable via email
Shoppers reachable via email provides users with insight into how many individuals on their database can be actively communicated with via email. This data is presented as both line graph, visually highlighting database growth over time and as a bar chart, showing Total Engaged Shopper (Those who can be contacted via email), Total Unsubscribed (Those who have chosen not to receive emails at the point of engagement) and Total Unsubscribed via Email (Those who received emails previously, but have since unsubscribed using the link, found at the bottom of a email they received).
Audience
Audience provides users with a detailed analysis of their engagers demographics and tags. It allows them to see the way by which their database is segmented both regarding demographics and user generated tags.
Visualiser
The Visualiser allows the users to see which demographics and tags are succeeding or failing by displaying a pie chart of the total engagers. This makes it easy for the user to see the areas in which their audiences are engaging. The Visualiser also has a section below the pie chart where the users can look through the demographics and tags engagements number by picking the desired field.
Profiles
The Profiles section focus more on the individual engager, it does this by providing a history of engagements with the most recent at the top of the list. This also provides details such as name and email. On the right, the user can look in to the engagers full profile along with loyalty detail, what tags the engager has engaged with and a history of the users’ campaign engagements.
Publication Centre
The Publication Centre allows the user to view all recent published ezines and landing pages carried out on that account compiled into one table. Every time a user selects 'Publish' upon completing their ezine or landing page the information is collected and placed into rows relating to that specific published component. The data presented in this table shows the date of which the publishing was carried out, the title of the campaign, type of campaign, the name of the user as well as the success (status) of the published component.
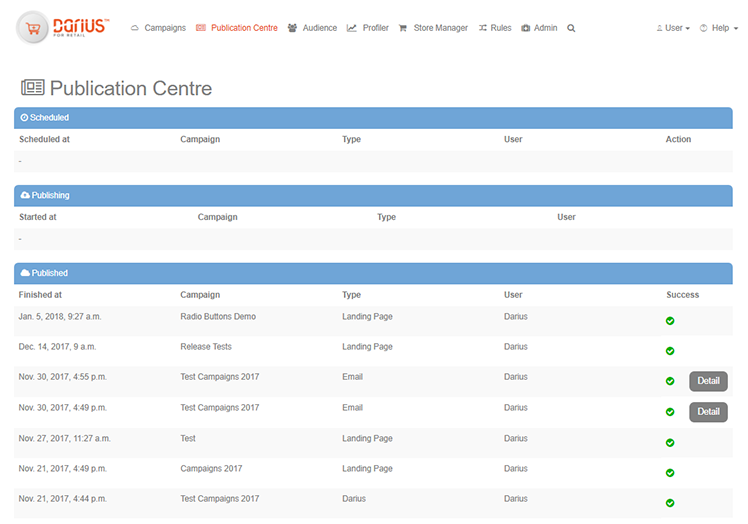
- Date - The date and time of when the user has selected the 'Publish' button upon completion of their ezine or landing page.
- Campaign - Here the user can view which campaign the published content belongs to.
- Type - This column will state what type of component was published. This can only be one of two options: a Landing Page or an Email.
- User - The name stated in this column is the logged in user which carried out the publishing action.
- Success - In this column depending on whether the component published was an email or a landing page the user can view the status and further information for this published component.
- Navigation buttons « » - By using these buttons the user can navigate through the pages of the publication centre as well as viewing the page number they’re currently on.
Landing Page Publication
Successful publication of a landing page will show a green tick icon next to this specific row to signify that the component was published correctly with no issues therefore, requiring no further action. Please note, if there is an issue with the publication of a landing page Darius™ will notify the user in the first instance at Design level noting that the publishing has failed not allowing the user to go any further until the issue has been resolved.
Email/Ezine Publication
In the case of an ezine publication however, depending on the status of the publication it will either have a green tick icon or a red warning sign in the final column alongside a ‘Detail’ button. A successful publication will show green tick icon next to this specific row to signify that the ezine has been published correctly with no issues therefore, requiring no further action.
However, if an issue has arisen with the publication of the ezine a red warning sign icon will be shown. If this situation occurs urgent attention is required. The user will need to view the issue(s) behind this warning sign for this publication via selecting the ‘Detail’ button directly beside the status icon. The ‘Publication Detail’ page specific to that published component is then opened giving the user a more in-depth look on the data behind the publication including: the list of engagers the ezine was published to successfully in the left hand column and unsuccessfully, in the right hand column.
As previously mentioned users can navigate through the pages via the list of numbers located at the bottom of the corresponding column(s). Engagers that are listed in the ‘Unsuccessful Engagements column’ can be a result of several reasons, from running out of credits currently available on that account to the most common reason being that that email simply doesn’t exist.
Go to Top
Administration
Message Centre
The Message Centre is an inbox which will display messages when a component has been
published. It is accessed by clicking on the username in the top banner and selecting
Message Centre. If there are three unread messages, an icon will display
3 beside
the username. A message will be sent to the Message Centre when a component has
completed publishing. For example if 1,000 emails are schedules to be sent at 5pm, a
message will only appear in the Message Centre, after the last of these emails has been
sent. Unread messages will be emboldened and an email icon will also be shown. A message
can be viewed by clicking on the Subject, and when opened it will display when it was
received, the sender, the subject and the content of the message.
Account Management – Preferences
The Preferences section allows the user to edit the security controls currently in place on their account. From this page you are able to change/update their password, set up Two-Step Authentication as well as adding/revoking Social Network Permissions.
- Password – A form for the user to enter their current and new password for that account. At Darius™ we recommend changing your password every 90 days to ensure your account is extra secure.
- Two-Step Authentication – A walkthrough provides the user instructions on how to set up Two-Factor Authentication on their account and a unique QR is generated by Darius™.
- Social Networks – Social networks allows users to view all their OAuth credentials as a list; these are used in part with APIs.
🔑 Password
This section provides the user with a form requiring all the fields to be entered. The first field requires the account’s current password followed by two fields for the new password. For a user to update their password their new password must meet the following criteria: passwords must be at least 8 characters long, contain at least one capital letter, one lowercase letter and one digit. As well as containing one special character e.g. $, * , + and should not be based heavily on a dictionary word (e.g. 5_apples).
Once the form is complete and ready to submit select the ‘🔑 Save Password’ button located at the bottom of the form. If unsuccessful Darius™ will notify the user to resubmit their form whilst letting the user know why the save was unsuccessful. Once a new password has been successfully saved an email will be sent out to the address registered to that account.
📱 Two-Step Authentication
Two Factor Authentication, also known as 2FA, two step verification is an extra layer of security that is known as "multi factor authentication" that requires not only a password and username but also something that only, and only, that user has on them, i.e. a piece of information only they should know or have immediately to hand - such as a physical token. In this case Darius™ provides the user with a unique QR code to scan with their smartphone.
Registering a device
To begin the Two-Step Authentication set up first the user must select the ‘Register 2-Step Device’ button. Darius™ will then generate a unique QR to be scanned with their smartphone. Whilst having Google’s Authenticator app open hover over the QR for the app to register the code. Once this QR code has been scanned Google Authenticator will generate a 6 digit token to be entered into the field below the QR code. To submit the completed form select the ‘Submit token’ button or select ‘Cancel’ to return to the previous menu. If the Two-Step Authentication was successful the next page will provide two options for the user to ‘Disable’ or ‘Unregister Device’ for use at a later date.
- Disable – Selecting this button will automatically revoke any link from the user’s smartphone to Darius™ until re-enabled by the user. This can later be set up again by reselecting the ‘Enable 2-Step Authentication’ button located on the same page accessible from the 2-Step Authentication option in the ‘Preferences’ menu.
- Unregister Device – A pop up asking the user to confirm their final action to unregister the device by selecting ‘OK’ or ‘Cancel’ to return to the previous menu.
Social Networks
If the user has access to a social media account on a platform the table will provide the relevant data specific to that platform as well as that account. If successfully connected the user will have two options (the names of the buttons are named accordingly with the platform it’s linked to).
- Revoke Twitter – Once the user selects this button Darius™ will remove any access granted to that social media account. Please note, doing this does not affect the social media channel in any way.
- Revoke Facebook – Upon selecting this button the user’s Darius account will no longer be set up to access rights to that Facebook account. Please note, doing this does not affect the social media channel in any way.
Account Management – Switching Accounts
If the user has more than one account within Darius they can switch between them. This is done by clicking on their user name in the top right corner.
This will then lead to a drop-down list, if the user clicks on the name of the account they are already on it will bring up the account Switcher. The next stage is to scroll through the list provided till finding the correct account. The user can then change accounts by clicking the button saying switch account.
Searching Campaigns
Campaigns can be searched from the Dashboard with only those campaigns that match the search criteria being returned. The search term should contain full words unless wildcards are used and it is not case sensitive. Clicking the search icon will begin the search. A wildcard is a character that will match any character or sequence of characters in the search, with Darius enabling use of the following wildcards:
- Performing a single character wildcard search using the ? symbol
- Performing a multiple character wildcard search using the * symbol
For example if a campaign has a name of Campaign Summer 2014, the following search terms will return this campaign in the results:
- ?ampaign
- *ampaign
- cam*aign
- *aign
- Summer
- summer
- 2014
Each search will display the number of campaigns which match the search string. 15
search results are displayed per page on the Dashboard. For example it will say,
Displaying campaigns 1 to 15 of 22 for criteria: test.
Import Data
This section outlines the requirements for uploading data which then enables the publishing of content audience groups (tags). A template upload file has been provided for reference to assist in this process, while guidelines are outlined below.
- fname should contain the First Name of the engager.
- lname should contain the Last Name of the engager.
- email should contain the email address of the engager.
-
dob should contain the Date of Birth of the engager in any of the following formats:
- dd-mm-yyyy
- dd-mm-yy
- dd/mm/yyyyy
- dd/mm/yy
- gender should be male or female or left blank.
- address1 is the first line of the address.
- address2 is the second line of the engagers address.
- city is the persons town or city.
- state is the persons State or County.
- postcode_zip is the Postcode or ZIP Code of the engager.
- countrycode is the country code of the person. For UK mobile the value of this should be set to 44, for US this should be 1, for Republic of Ireland this should be 353 etc. You must leave this field blank if there is no mobile number..
- mobile is the persons mobile number, and all numbers in the UK should start 7, i.e. the first digit is not to be a 0 (zero).
N.B. This is for mobile numbers only, please do not upload landlines or fixed line numbers in your data.
- sms_optin is whether the person has given their consent to being contacted via SMS. By entering a value of 1 this signifies the individual has given their consent to being contacted via SMS. By entering a value of 0 this signifies you do not have consent to contacting the person via SMS.
Please note: severe fines ($500 per unsolicited SMS issued) will be issued in the USA if the person is marked as can receive SMS and has not given the brand or client express written permission receive these communications.*
- mail_optin whether the person has given their consent to being contacted via Email.
By entering a value of 1 this signifies the individual has given their consent to being contacted via Email. By entering a value of 0 this signifies you do not have consent to contacting the person via Email.
- tag1 this is the first tag which is assigned to the person. Each individual can have many tags associated to them.
For example Each individual can have many tags associated to them. For example tag1 could be Student, tag2 could be Fashion and tag3 could be Fitness.
Tags are used to define audience groups with Darius having the ability to publish email and SMS to tags – e.g. an email could be published to a tag of Fitness with information, which is only relevant to that group of engagers. Some examples where tags could be used are to differentiate between groups, classify them as belonging to that group and create audience groups for more targeted communications.
Tags should only contain alphanumeric characters and can contain spaces if required.
* “any company using robocalling or outbound text messaging must prove that the consumer gave consent in writing (either on paper or electronically in an e-signature) or face heavy fines. The revisions lay out the fines consumers can sue violators for: $500 per violation if it was unintentional, and triple that if the company “knowingly and willfully” violated the rules.”
Click here for full article reference
Go to Top
Store Manager
Accessing Store Manager
After arriving on the Darius Dashboard, navigate to the Store Manager Tab, which can be found in the menu bar at the top of the page.
Find your store
Within “Store Manager”, you will be presented with a world map with each of your stores represented by small icons in their respective real world locations on the map. Clicking on any of these icons, and clicking on manage will bring you to the management page for that store. You can have multiple stores per account.
Proximity
iBeacons
iBeacons are small intermediary devices capable of sending a number of notifications to users currently connected to them, including Email, SMS and Push Notifications. Multiple iBeacons can work in tandem with each other allowing you to track connected users movements throughout your premises. iBeacons can also monitor aspects of their surrounding including movement (such as fridge doors opening, or shoes being lifted off the shelf) and the temperature.
View iBeacon Sessions
From here you will be able to view both Active Sessions, which will includes users who are currently connected and Recent Inactive Sessions, which will include users whom have recently disconnected and are no longer in range of any active iBeacons.
iBeacon Management
From here you can View and Edit the status of existing iBeacons. Editable parameters include:
- Beacon Name - The name you choose to give the iBeacon. Ideally it should relate to the iBeacons location within the store for management purposes.
- Store - The store to which the iBeacon has been assigned.
- Beacon UUID - UUID stands for Universally Unique Identifier. It contains 32 hexadecimal digits, split into 5 groups, separated by dashes. This will be provided when the iBeacon is supplied or via the Estomote App.
- Beacon Major/Minor - Major and Minor values are numbers assigned to your iBeacons, as an additional identifier.
- Colour - The colour of the iBeacon which can make identification easier.
This section also provides you with the option of registering a new iBeacon. in order to register a new iBeacon, you will be required to provide the same information mentioned above.
Continue to the next video to learn more about iBeacons
Wi-Fi
Wi-Fi is a wireless network internet connection. It allows customers to connect to your stores internet. Similar to iBeacons, once a user has connected you are capable of publishing a number of notifications, specifically SMS and Email directly to their phones once they are connected/reconnected.
View Wi-Fi Sessions
From here you will be able to view both Active Sessions, which will includes users who are currently connected and Recent Inactive Sessions, which will include users whom have recently disconnected from the Wi-Fi.
For both Active Sessions and Recent Inactive Sessions, similar information and actions are provided. Both the name of the engager, and the time at which they connected is provided, as well as the ability to publish SMS Messages and Emails to users.
Wi-Fi Device Management
Similar to the iBeacon Management section, users can register Wi-Fi Devices. By clicking Register New Device, users will be presented with a screen asking for details relating to the device, including Name, Store Name, Device Id and Provider.
Once created the newly registered device will appear on the list of Wi-Fi Devices. Users are provided with the device name and the ability to edit certain aspects of the device as needed.
Checkout
Offer Management
Offer Management provides you the ability to create offers for shoppers. There are two sections to offer management. Store Offers which are offers specific to a select store and Account Offers are offers that can be used over a number of stores. In each section you will see an offer description and the choice whether to View/Edit the details of the offer at any given time.
By clicking Create Offer you will be able to create a new offer. From here you will also be able to choose whether an offer is unique to a single store (Store Offer), or available at multiple stores relating to the account (Account Offers). In order to create an offer, the following information is required:
- Code this is the code that will be on the offer.
- Code Type Code (39 Ean, Ean13, Ean8, Gs1, Gtin, Isbn, Isbn10, Isbn13, Issn, Jan, Upc, Upca) - Code type differentiates what type of code it is at the Point of Sale.
- Main Line This is the main title that will be seen on the offer.
- Tag Line Short Description of what the offer is.
- Discount percent This is the percentage a shopper will get off an item.
- Terms & Conditions Terms and conditions are needed to make sure the user does not use the offer in the wrong way.
- Maximum Unique Views This is how many times the voucher can be viewed.
- Maximum Redemptions This is how many times the offer can be redeemed.
- Seconds to display This is how long the voucher will appear on the shoppers screen.
- Account Darius™ allows users to have multiple accounts, this would let the user determine which account the offer can be used in.
- Store Each Account can have many stores, this allows the user to select which store the offer would be suit.
- Active This will determine whether the offer can be used. If the offer is only available on a certain date then it would only be active for that date.
- Start Date (dd/mm/yyyy) When the offer can start being used.
- Expiry Date (dd/mm/yyyy) When the offer finishes.
- Image s3 file This allows the user to upload a custom image that can be used at the Point of Sale.
Offer Redemptions
This section allows users to view if and when each offer was redeemed. The Offer Redemptions section allows you to see when a shopper used the offer, what type of offer it was and the engager’s details. To get back to the store manager dashboard click on the dashboard breadcrumb along the top.
View Shopper Passes
The Shopper Pass section allows you to view an individual's shopper pass, the date it was created and the shoppers email address. By clicking on view, the shopper pass will be downloaded as an attachment. When opened it will provide a preview of the pass and will include the customer’s name and their specific bar code. It will also give you the option to find out more information about the shopper pass, including:
Email associated with the Shopper Pass Customer ID Terms & Conditions
- Serial
- By clicking in Add to Passbook it will give you the chance to send the pass to your phone.
View Transactions
The View Transactions section will present you with a list of information which will included Time Signatures and Dates, Values and Quantities, all of which relate to a transaction at your chosen store. By Clicking View found to the right of each item on this list, you will be presented with a more detailed overview of the transaction included Items Purchased, A Transaction ID, Purchase Details, Cashier and Till Name.
Go to Top
React
Rule Management
The Rule Management section is the nerve centre of Darius’s In-Store features. From here rules can be created for Wi-Fi, iBeacons and Checkout triggers. Actions include push notifications, emails and SMS based on any number of variable, such as location, time and purchase history.
To add a rule, click on the Add Rule button on the bottom right of the screen. The user will be greeted with a drag and drop grid where the rule can be created.
Creating a rule for an iBeacon:
The first step of creating a rule is to give it a name that you will be able to recognise in the future. The second step is to drag and drop which iBeacon you would like to create the rule for. This creates a radius slider along the bottom of the Rule Grid, use the slider to and select the radius the iBeacon will send the message out too. If the user makes a mistake and selects the wrong iBeacon the click on the small red “x” on the top right hand corner of the Properties box.
After selecting the iBeacon, the Tools is next. There are two Tools that can be used which are:
- Timer Days which allows the user to select which days the rule fires on.
- Timer Hours which allows the user to select the exact hours that the rules fire.
- Times Per day which means it will allow the user to select the exact times it will fire to the same person.
- To use these Tools the user will simply place the cursor on the arrows.
- The final step is choosing your actions for your rule. There are 5 types of actions
- Send offer – then select the offer that you would like to send.
- Send email – then select the email that would best suit.
- Send SMS – send a personalised SMS.
- Sent to a Smart Case – This could be a refrigerator in your store.
- Send APNS – This is an Apple Push Notification and this can only work if a shopper has the stores app on their phone.
Once the Rule is created, the user can go back into the list of Store Rules to make any amendments as needed.
To make amendments the user can click the details button. If the user has to change to iBeacons, tools or actions then they simply follow the same steps as when setting the rule up. One thing to keep in mind, when changing the iBeacons the properties will reset and you will have to adapt them to suit your new rule.
React Dashboard
The React Dashboard provides you with an overview of all activity in your store relating to the Darius Proximity platform. This includes iBeacon activity, Wi-Fi Activity and Checkout Activity. This section also provides a degree of environmental and reference information including Weather, Temperature and Store Location.
The Daily iBeacons Metrics section provides you with information relating to any iBeacons currently active in your store including the number of known Users currently connected to an iBeacon, anonymous users currently connects and the proximity of all users to their nearest iBeacon.
The Daily Checkout Metrics sections provides you with an overview of all transactions, items sold and revenue. Similarly they also provide information relating to whether or not a transaction was completed by a known or anonymous user.
Communication Restrictions
Whether you’re using emails, SMS messages, app messages, or app offers, limiting communication with a customer helps ensure you only engage with them at the most pivotal moments.
Communication Restrictions help you do this by limiting how much a customer is contacted within a given period of time.
To manage all of your Communication Restrictions, click on
Store Manager at the top of your DariusTM dashboard. You’ll see a map of all your stores. Hover over the store you want to modify, then hit
Manage.
Once inside the Store Manager dashboard, click the
Communications Restrictions button in the 'React' section at the bottom.
Here, you can set limits to how often you communicate with each customer via email, SMS, mobile app message, and mobile app offer.
For each mode of communication, there are two parameters you have to dictate.
- *time period* - This lets you set the unit of time for your restriction -- either minutes, hours, days, weeks, or months.
- *time span* - This is the amount of time the restriction will be in place. If you want to limit communications to *two days*, you should set a time *period* of *days*, and a time *span* of two. Using a time span of *zero* means that no restriction will be set.
Note: Before clicking Save to put your new Communication Restrictions in place, just keep in mind that you *must* set a time period and a time span. This applies whether it’s over email, SMS, mobile app message, *or* mobile app offer.
PB 11-05-2016 V2.6.1 Public
Go to Top
Appendix
Appendix I - Social Media Account Set Up
Using Darius a user can connect a Facebook, LinkedIn or Twitter account, giving the ability to post content to Facebook pages linked to the Darius™ user. After adding a Social account to Darius, the pages/accounts of that account are automatically displayed.
Note: During the configuration, notices will be displayed by Twitter informing the user changes have been made, however it will take a moment for them to be reflected. Waiting a moment and refreshing the browser should see the changes reflected.
To add a Social Media account, a user should select
+ Add Channel from the Social component design page in Workbench. When the Facebook tab is selected this will check for any pages already available and an option to Connect with Facebook, Connect with Twitter or Connect with LinkedIn. Choose a page already connected, or click
Connect with …. and follow the steps within the pop up window to authorise a new account.
Appendix II – Revoking access to a Social Media Account
To remove a Social Media account:
- Click the drop-down menu under the User Name along the top-level navigation
- Select Preferences
- Select Social Networks
- From this menu, you can choose to either Revoke Twitter or Revoke Facebook
Appendix III - Text Editor
Darius uses a highly flexible text editor to design emails and landing pages which gives the ability to design content using CSS if required. This editor includes ability for:
- HTML Source
- Undo and redo
- Cut, copy and paste
- Inclusion of images in emails and landing pages
- Adding YouTube videos to landing pages
- Bulleted and numbered lists
- Adding tables
- Text styling
- Add Lead Capture & Survey to landing pages
- Links to external sites or places in the same document
If using the HTML
Source button on CK Editor, please be careful not to remove any of the html and/or JavaScript that is generated automatically by CK editor. Doing this could break the Landing Page/Responder and email forms.
For additional information on the editor select the relevant documentation from below, however it should be noted that some features may not be available or appear slightly different from the documentation:
Appendix IV - Shopper Pass
To find the base and content code required to create a shopper pass, please download visit here.
Appendix V - Personalization Codes
In order to display personalised information in a landing page response or email, simply click on the Personalization button on the editor

or include the relevant code for the list below.
- {{ first_name }}
- {{ last_name }}
- {{ email }}
- {{ phone_number }}
- {{ address_line_1 }}
- {{ address_line_2 }}
- {{ city }}
- {{ state }}
- {{ postcode_zip }}
- {{ gender }}
- {{ dob }}
- {{ engager_id }}
- {{ loyalty_id}}
Appendix VI - Generating a personalised coupon (displayed in email as a QR code)
With the right equipment in store, you can scan a personalised coupon directly from and email. To have the coupon display as a QR code on an email, use the following steps:
- Create your coupon in Store Manager. (see Offer Management)
- Once created and saved, view and copy the web coupon URL.
- Create or open the email that you would like to include the coupon/voucher QR within
- Click “source” button within the CK Editor in the email builder and find the location within the HTML that you want the QR Code to display.
The URL that you will need is made from 3 key elements which has been demonstrated in different colours below:
Green – the same for every URL being inserted
Red – Coupon URL – this will change with every offer/coupon/voucher
Blue – Changes depending on the install being used (i.e. app, us etc).
Example layout below:
<img src="https://example.dariusengage.com/api/util/qrcode?data=https://example.dariusengage.com/dfr/checkout/coupon/view/5d48372b8a0cc3193cccf4a4/{{engager_id}}" />
NB: When adding the code above, it has to been added in a “src” URL link of an image NOT a paragraph tag, so ensure that the <p> and </p> are not included before or after the code that you are inserting.
- Once added, close “Source” and click “Save”.
The finished version will appear like this:
 Go to Top
v4.8.0 19.8.19


